After purchasing a VPN, to connect via Cisco on Mac, you must first download the Cisco AnyConnect client from the links below:
- Direct download for Sequoia and new macOS updates
- Direct download for Mavericks version
- Direct download for other versions
After downloading the program, you need to install it on your Mac and then run it. Follow our tutorial step-by-step to connect to the Iran VPN without any issues. In this guide, we have fully explained the Cisco installation and connection steps.
Step One: Unzip the file and move the application to your desktop.

Step Two: Click on the specified file to open the window, then click on the designated section.

Step Three: Click on the Cisco AnyConnect Secure Mobility Client option.
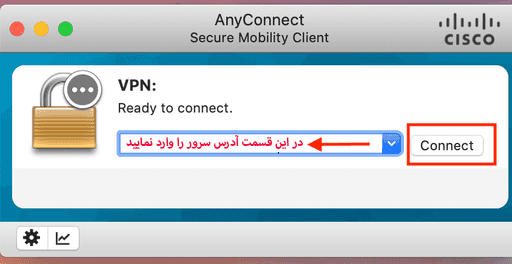
Step Four: After running the Cisco AnyConnect Secure Mobility Client, the Cisco service window will open. Enter the server address in the designated field and then click the Connect button.
- Cisco non-financial server address for Mac: 78.157.57.69
- Cisco financial server address for Mac: 78.157.57.88
Step Five: If you see the Untrusted VPN Server warning, click on the Change setting option.

Step Six: Uncheck the Block Connection To Untrusted Server option.

Step Seven: If you see the message “Security Warning: Untrusted VPN Server Certificate!”, click on the Connect Anyway option.

Step Eight: Enter the account username sent to you after purchase in this field. Then click OK.

Step Nine: Enter the account password sent to you after purchase in this field. Then click OK

Step Ten: If you have followed all the steps as per the tutorial above, a successful connection will be established.

Note: If you encounter the error message “Cisco AnyConnect can’t be opened because it is from an unidentified developer” during installation, go to System Preferences, then Security & Privacy, and select the General tab. Finally, under the “Allow applications downloaded from” section, select “Anywhere” (if the options are greyed out, click the lock icon at the bottom-left of the window).